Valentine's Day

Smiley Face Craft

Mosaic smiley face craft

I love this happy, mosaic smiley face craft! It is perfect for giving to a friend or family member. While I had originally come up with for my son to mail to his friend, with Valentine’s Day just around the corner, I think it would make a great Valentine too! Mosaic crafts are a great way to use all of those little extra pieces of construction paper leftover from other crafts. Plus these crafts are great for fine motor skills, shape recognition, and spatial awareness too.

Supplies Needed:

How To:

Print out the “You Make Me Smile” sheet if you’d like to use my template. Otherwise, draw a large circle on a piece of paper.

Now it is time to make all of the little mosaic pieces. Cut the construction paper into a variety of shapes. I have a sandwich bag full of extra scraps of paper that I keep for mosaic crafts, so my son just pulled out the pieces he wanted. Having lots of different shapes and sizes to choose from helped him get the look he wanted without having to use pieces that didn’t fit well. So if you are cutting them specifically for this project, cut some extras so that there are lots of choices for your kiddo. I had to round a few edges for him since our craft is circular.

Now that you have your pieces of paper ready, glue them all over your paper to make your yellow face. Let your mosaic pieces dry.

Paint 2 eyes and a smile on your face. I like to use Crayola Washable Paints. These paints are so easy to wash off of my son’s hands, the paintbrush, and our table.

Let your mosaic smiley face craft dry before giving your project to a friend or family member!

I’ve joined Amazon’s Affiliate program to try and help cover the costs of this site. So if you buy something through one of my links on Amazon, then I get a small percentage of the sale (no extra cost to you). Thank you for your support! Happy crafting 🙂

Valentine's Day

Hug Craft

paper hug craft
Paper Hug Craft

I LOVE this hug craft! It’s my son’s actual arms and handprints! I hung this in my office so I could always have a hug. This craft turned out so great, and it is pretty simple to make!

Supplies Needed:

  • 3 different colors of construction paper
  • scissors
  • pencil
  • glue

How To:

Pick 3 different colored pieces of construction paper. We ended up with primary colors, but any colors you pick will make a great hug.

I asked my son to lay his hands and arms across the blue paper and I traced their outlines. Then I cut them out. Next, I cut out a heart shape from the red paper. I wanted the heart to be large enough so that it could be seen under the hands, but not so big that it took up all of the space.

My son glued the heart to the middle of the yellow paper. Next he glued one hand on the heart, with the arm at a downward facing angle. Then glued the arm down. The blue arm paper is longer than the yellow paper, so fold it and glue it to the back of the yellow sheet. This makes it look like the arm is wrapping around, giving a hug.

He glued the second hand slightly on top of the first hand and glued down the arm portion. Like the first arm, he had to fold it and finish gluing it to the back of the yellow paper.

Once it’s dry, you have this awesome hug to take to work or mail to a family member.

Check out my Crafts Page for more things to make with your kiddo! Here is a list of HUG Stories to read with this craft.

Animals, Valentine's Day, Winter

Heart Dog Craft

This heart dog craft is so cute! It makes a great Valentine present or a sweet card to a dog-lover 🙂 My little one loved this craft and he was excited to show it to our dog.

Heart Dog Craft
Hear Dog Craft

Supplies Needed:

How To:

Print off the heart dog craft template. It is a free, downloadable PDF.

picture of heart dog craft

Decide what colors you want to use for your Valentine’s Day doggy and then color all of the pieces on the template. Use your creativity to add whiskers, a patch around one eye, or multi-colored ears. My son wanted to make his craft look like our dog 🙂

After all of the shapes have been colored, cut out the pieces. Rounded edges are hard for little ones, so an adult may need to do the cutting.

On a piece of construction paper, assemble the shapes to form a dog. Look at the sample on the craft template. The large heart is the face; the 2 medium hearts are the ears; 2 ovals are the eyes; and the small heart is the nose.

Glue all of your pieces onto the construction paper. Write a cute Valentine’s Day message: ” I RUFF You,” or “Puppy Love,” or “I HEART You.” Let your dog dry before showing off how cute it is!

Looking for More Crafts?

Check out my Crafts Page for more fun things to make with your kiddo! There are more animal crafts to make, Valentine’s Day crafts, and lots of fun 🙂

Animals, Valentine's Day

Cute Sheep Valentine Craft

Cute Sheep Valentine Craft

Wooly Be My Valentine? I hope you say “yes!” I love puns, so I couldn’t resist this cute sheep valentine craft. My son and I enjoyed making this together. He likes using pom-poms and having creative freedom to mix and match colors and sizes. Use the free template for your sheep and add your pom-poms to make your very own valentine. Who are you going to give your valentine to?

Supplies Needed:

  • pom-poms in assorted sizes and colors
  • white glue
  • sheep template (free PDF printable)
  • crayons

How To:

This craft is pretty straight forward and easy for preschoolers to do. Adults will need to help with the glue, but kids will love adding their pom-poms! Getting the different sizes to fit together is kind of like a puzzle and great for preschoolers’ spatial awareness development.

Begin by printing off the free sheep template.

Grab your crayons and color your sheep. My son left the body and the wooly part of the head white, but colored in the rest of his sheep. His favorite color is blue, so he made a blue sheep.

Pick several different sizes and colors of pom-poms. Using the white glue, glue the pom-poms onto the sheep’s body and wooly tuft on top of its head.

Let your cute sheep valentine craft dry before you give your valentine to someone special!

Winter

Easy Peasy Tissue Snowflake Craft

easy peasy tissue snowflake craft
Easy Peasy Tissue Snowflake Craft

Looking for a quick and easy winter craft to keep your preschooler occupied? Try this easy peasy tissue snowflake craft! All you need is a sheet of paper, tissue paper, a pencil, and a glue stick.

Tissue Snowflake Craft

My son loves blue so we made a blue snowflake on white paper. Pick any color background paper you like and then pick a tissue color that will show up nicely. Draw a basic snowflake shape. Mine took up most of the paper.

Help your kiddo wad up the tissue paper. Our tissue paper came in 1-inch squares so we didn’t have to cut or tear it into small pieces. If you are using a large sheet of tissue paper, cut it into small pieces for your child. I bought a pack of pre-cut tissue squares from Oriental Trading that came in a variety of colors; it is one my go-tos for crafting!

Using your glue stick, glue on your wadded up tissue paper balls along the snowflake lines. Once you have covered the lines completely, you will have a tissue snowflake to show off! Add glitter or sequins if you would like your craft to have some sparkle!

More Snowflake Crafts

There’s just something so magical about snowflakes that I can’t help but be drawn to them! My son and I have made several snowflakes crafts together and they have been a lot of fun 🙂 Here are a few more crafts for you to try:

–Secret Snowflake Painting –draw snowflakes with a white crayon and watch your child discover secret snowflakes when they paint over your drawings!

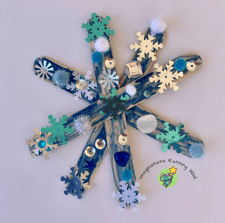
–Craft Stick Snowflake: add some sparkly winter fun to your seasonal decorations with this cute craft stick snowflake!

–Frozen-Inspired Windsock: create a sparkly snowflake windsock inspired by the movie Frozen!

STEM

Leakproof Bag Science Experiment

leakproof bag science experiment
Leakproof Bag Science Experiment

This leakproof bag science experiment is fun and easy to do with your kiddo. My son saw this and was describing it to me, so I Googled and found a how-to from the Indianapolis Public Library. We tried the experiment and we were so excited that it really worked! Wow, we couldn’t believe that we could actually poke pencils through the bag without the water coming out! We were so impressed!

Supplies Needed:

  • Ziploc bag (we used gallon sized)
  • sharp pencils
  • food coloring (optional)
  • large bowl (optional)

How To:

We filled our bag halfway full with water and a added a drop of blue food coloring to dye the water. While this is totally optional, it did make the project more colorful and more fun for my blue-obsessed kiddo.

Leakproof Bag Experiment

Next, we moved our project to the table and I held up the bag over a bowl (I was worried there would be a leak). I’m glad I had a bowl, because during the experiment, our bag did begin to leak (more on this later). While I held the bag, my son shoved a sharpened pencil through one side of the bag, through the water, and out the other side. Wow, it didn’t leak! We were all really impressed. My kiddo continued to stick in the pencils until he ran out of pencils.

TIP— when sticking in the pencils, try to keep the pencils far apart from each other. My son stuck one pencil right next to another pencil and that did make a small hole. Water started slowly leaking from the hole in the bag. Good thing we had bowl underneath.

The pink and black pencils were too close together and they make a small leak in the bag

The small hole my son accidentally made lead to a learning experience — the Ziplock bag clings to the pencil, forming a seal that keeps the water locking. However, when two pencils touch, the bag isn’t able to make a seal in between the pencils so we got a leak.

After you have stuck all of your pencils through the bag, hold your bag over the sink and slowly remove the pencils. Water will come out of the holes. We dried our pencils with a paper towel. They were totally fine and ready to color with the next day.

So why doesn’t it leak? Our friends at the Indianapolis Public Library say plastics are bendy and stretchy because of their flexible molecule chains, so when you stick your pencil through the plastic bag, the plastic makes a seal around the pencil.

Check out more preschool STEM ideas: https://imaginationsrunningwild.com/stem/

Winter

Secret Snowflake Painting-

Secret Snowflake Painting

Channel the magic of winter with this secret snowflake painting activity. Make this fun winter snowflake craft together and watch as your child is surprised when the secret hidden snowflakes are revealed by the watercolor paints. This is a quick and easy, joint parent-child craft, but it turns out pretty cool. The kids have no idea that snowflakes are going to appear!

Supplies Needed:

  • white crayon
  • white paper (I used cardstock)
  • watercolor paints
  • paint brush
  • water cup

How To Make a Secret Snowflake Painting:

Grownup — First, draw snowflakes onto the paper using the white crayon. I know it’s hard to see what you’ve drawn. Try angling the paper toward the light so you can see a slight shimmer reflect on the crayon. Draw snowflakes, snow dots, and spirals all over your paper.

After you have drawn your “secret” snowflakes on the paper, ask your child to paint the paper with watercolors. I told my son we were making a winter picture and suggested that he use blue and purple. He was amazed to see the secret snowflakes appear on the paper as he painted!

Ta-da, now you have your own super cool, secret snowflakes! Let your project dry before showing it off too much. Fortunately watercolors dry pretty quickly 🙂

sparkly craft stick snowflake

Pair this craft with Ezra Jack Keats’ book, The Snowy Day. The book is full of beautiful snowflake illustrations! It might just inspire your child to make more snowflake paintings or make a sparkly craft stick snowflake!

STEM, Winter

Winter Fizz STEM Activity

My son really enjoys doing science experiments and making fizz is a favorite of ours! It’s really easy to make and clean up. We decided to make a winter fizz STEM activity by adding blue glitter to experiment. Usually when we make fizz, we like to color the vinegar, but this time we left it plain so that they baking soda stays white like snow. The blue glitter added a fun sparkle that my kiddo loved! We enjoyed doing this together so you will see that we had 2 cups and 2 measuring spoons so that we could take turns adding vinegar to the baking soda.

Winter Fizz S.T.E.M. Activity
Winter Fizz STEM Activity

Supplies Needed:

supplies for Winter Fizz STEM Activity
  • bowl or foil tray 
  • 1 box of baking soda 
  • blue glitter
  • paint cup (we reused a plastic fruit cup)
  • white vinegar
  • Measuring spoon (for spooning the vinegar into the tray) or eyedroppers/pipettes

Prep. Work:

  • Pour baking soda inside the tray so that the entire bottom is covered
  • Sprinkle the blue glitter around the tray on top of the baking soda
  • pour vinegar into the cup(s)
add baking soda and blue glitter

Making the Winter Fizz

Winter fizz STEM activity
Winter Fizz STEM Activity
  • To make the fizz, spoon some of the vinegar into the tray. Watch as the vinegar bubbles up when it touches the baking soda! The glitter looks awesome as the bubbles rise up 🙂 We thought the fizz looked like snow!
  • Keep spooning vinegar* into the tray until all of the baking soda is covered in vinegar.

*the larger amount of vinegar that you dump into the tray at a time, the larger your fizz will be !

We love making fizz and incorporating it into our themes! We’ve made superhero fizz, rainbow fizz, pumpkin fizz, and Christmas fizz too! Just add food coloring to the vinegar and use different glitter to make any kind of fizz you want 🙂

Check out more fun STEM activities: https://imaginationsrunningwild.com/stem/

Christmas, Winter

10 Preschool Christmas Crafts

Christmas is just around the corner and kids are getting so excited! Help channel that excitement into some fun Christmas crafts. We rounded up our favorite 10 preschool Christmas crafts to share with you.

preschool Christmas Crafts
Preschool Christmas Crafts

10 Preschool Christmas Crafts:

Decoupage Santa Hat: make a Santa hat out of craft sticks and red tissue paper.

Christmas Owl Craft: adorable owls made from empty toilet paper rolls and construction paper.

Paper Plate Peppermint: a cute, winter handprint craft to make with your preschooler.

Christmas Cookie Cutter Coloring: a fun way to use cookie cutters without the calories!

Candy Cane Craft: quick and easy candy cane craft out of construction paper and cotton balls.

Mosaic Gingerbread Man: use pieces of construction paper to make a cute gingerbread man craft.

Christmas Fireplace: make a festive Christmas fireplace for your toys!

Christmas Wreath: cute little wreath out of a paper plate that combines painting and coloring for lots of fun.

Candy Cane Reindeer: make a cute and yummy candy reindeer by adding pipe cleaner antlers, googly eyes, and a pom pom nose!

Fingerprint Snowy Tree: draw a barren tree with a marker and then your preschooler can paint on the snow with their fingerprints.

Craft Supplies:

I try to make crafts with supplies I already have at home because I hate having to put a project on hold to run to the store and get supplies. So if anytime you don’t have one of the things I mentioned, feel free to substitute it with something you have at home — there’s no wrong way to craft!

My go-to supplies are: construction paper, craft sticks (popsicle sticks), tissue paper, pompoms, Crayola glitter glue, paper plate, crayons, water color and Crayola Washable Paints, white school glue, and a glue stick. I’ve joined Amazon’s Affiliate program to help cover the costs of my site. So if you click on a product that I have on my site and buy something on Amazon, then I get a small percentage of the sale (at no additional cost to you). Thank you for support! I don’t ever recommend anything that I have not personally used and loved 🙂

Christmas, STEM, Winter

Christmas Fizz STEM Activity

 Looking to incorporate more STEM education into your preschooler’s activities? Then try this fun Christmas fizz preschool STEM activity! To make this Christmas themed, we used red and green food coloring and we added red and green glitter for sparkly fun. We had a blast watching it bubble up and we loved seeing the red and green glitter sparkle in the bubbles! Play some Christmas music in the background and enjoy this holiday STEM activity together.

Christmas Fizz S.T.E.M. Activity

CHRISTMAS FIZZ

Supplies Needed:

Fizz STEM activity supplies
supplies for Christmas Fizz STEM Activity
  • bowl or foil tray 
  • 1 box of baking soda 
  • red and green glitter
  • white vinegar
  • 2 paint cups ( we reused plastic fruit cups)
  • red and green food coloring
  • Teaspoon (for spooning the vinegar into the tray) or eyedroppers/pipettes

Prepare the Tray:

  • Pour baking soda inside the tray so that the entire bottom is covered
  • Sprinkle the red and green glitter around the tray on top of the baking soda
add baking soda and glitter to tray to make the FIZZ
add baking soda and glitter

Prepare the Paint Cups:

  • pour vinegar in each cup
  • add a drop of red food coloring to one cup and a drop of green food coloring to the other cup
  • stir the food coloring until it is well mixed with the vinegar

Making the Christmas Fizz

add some vinegar to the baking soda
Christmas Fizz
Christmas Fizz STEM activity
Christmas Fizz
  • To make the fizz, spoon some of the colored vinegar into the tray. Watch as the vinegar bubbles up when it touches the baking soda! The glitter looks awesome as the bubbles rise up 🙂
  • Keep spooning vinegar* into the tray until all of the baking soda is covered in red and green.

*the larger amount of vinegar that you dump into the tray at a time, the larger your fizz will be!

We love making fizz and incorporating it into our learning themes! We’ve made superhero fizz, rainbow fizz, pumpkin fizz, and winter fizz too! Just change the food coloring colors and use different glitter to make any kind of fizz you want 🙂

Check out more fun STEM activities: https://imaginationsrunningwild.com/stem/