Animals, Concepts, Math, Spring, STEM

Bug Graphing

Bug Graphing STEM activity for preschoolers

Add some STEM fun into your preschooler’s learning with this bug graphing activity!

Bug Graphing Activity:

Start by printing this free template. The bug graphing template includes the di, colored tiles, and graphing chart. I used regular printer paper; however, if you use cardstock, then your dice will be much sturdier.

Begin by cutting out the dice. Gently fold the gray tabs inward. Then begin to fold your squares into a cube shape. Add some glue to the tabs and glue them onto the underside of the squares as you form your cube. The very last tab is hard to glue and might require tape. Once your cube is formed, set it aside to dry.

Cut out all of the colored tiles. You will have 4 of each color–red, orange, yellow, green, blue, and purple. Each color corresponds with one of the bugs. My printer’s ink turned out to be darker than how it looked on my screen, so the blue and purple on the bugs were a little hard to distinguish. Here’s the color scheme: ladybug=red, butterfly=orange, bee=yellow, grasshopper=green, dragonfly=blue, and ant=purple.

Now it is time to begin bug graphing. Ask you child to gently roll the di. What color bug is on top? Is it a yellow bee? Take a tile of the same color and set it on the graph above the corresponding-colored bug. Keep rolling the dice and setting tiles in the correct columns until you reach the top of the column. Since you are not gluing the colored tiles to the chart, you can use this activity over and over again. The grasshopper was the first to reach the top for us. Which bug made it to the top of your graph first?

Why STEM?

STEM stands for science, technology, engineering, and math. It is important to introduce these concepts to preschoolers in a fun way so that as they get older, they are excited about STEM subjects. What are preschoolers learning in this activity? Preschoolers are learning their colors (science)! They have to identify the color on the di, find the same color on the chart, and then correctly add the same color tile to the graph. Preschoolers are learning how to graph, an important math concept! Add some extra math into this activity by counting how many of each color tile is on your graph and how many tiles your have altogether. Preschoolers are also learning about engineering as they help build the di!

More STEM Activities

If your child enjoyed this graphing activity, I made a free blank di template so you can customize it with your own pictures. You can add computer images, stickers, or draw whatever you want on the dice and graph for your child to practice more graphing skills.

Check out my STEM activities: https://imaginationsrunningwild.com/stem/

Bug Stuff!

My son is really interested in bugs and I’m sure a lot of your kids are too! We have made some great bug crafts together and enjoy playing with these bug finger puppets. The finger puppets look pretty life like and allow us to exam bugs without having to hold real ones! You can your own set through the Amazon Affiliate link posted above. I joined Amazon’s Affiliate program to help cover the costs of my site. If you buy a product through one my links, then I may get a small percentage of the sale at no additional costs to you.

STEM

Froot Loops Tower

Froot Loops Tower STEM activity

Incorporate STEM (science, technology, engineering, and math) into your preschooler’s learning activities with this fun (and yummy) Froot Loops tower! My son really enjoyed this activity, so much so, that we’ve done it a few times. Not only is this fun to do, but it is great for for kids’ fine motor skill development too! While you are your child are making this tower, take the opportunity to talk about colors and making patterns with the Froot Loops. Patterns and sequencing are important math components for preschoolers to learn. By making Froot Loop Towers, they can experiment with patterns by putting the cereal on the spaghetti noodle in different sequences.

Supplies Needed:

  • Froot Loops cereal
  • spaghetti noodle
  • Play-Doh

How To:

Froot Loops Tower

Start by making a mound out of your Play-Doh to use as the tower’s base. Then stick the spaghetti noodle into the mound. Make sure that you smush the Play-Doh around the noodle so that they noodle stands up straight.

It’s Froot Loops time! We dumped some Froot Loops onto a paper plate for my son to use for this project. He decided to make a rainbow tower. He did a fantastic job getting his rainbow colors in the correct order! Pick colors and a pattern you like. Now that you have a pattern in mind, take your Froot Loops can carefully drop each piece down the noodle, building a tower as you stack cereal pieces.

This looks like an easy activity, but little kids are still working on their fine motor skills, so getting the Froot Loops onto the noodle and building the tower is really work for them. And then add in making patterns, and they are really working hard. Fortunately they are having fun creating their tower and munching on the cereal as they go along!

For more ideas check out my STEM page: https://imaginationsrunningwild.com/stem/

Uncategorized

Cut the Vines Scissor Skills Activity

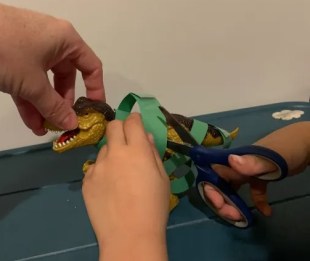
Cut the vines and free the toy! This a fun scissor skills activity for preschoolers to practice cutting. Preschoolers love using scissors, so let’s give them constructive opportunities to practice cutting. I told my 3 year old son that the dinosaur was trapped in the vines and that he had to save him! I gave him scissors and told him to carefully cut the vines off and free the dinosaur. He really enjoyed this scissor skills activity and took his job of freeing the dino so seriously!

cut the vines and free the toy scissor skills activity supplies: plastic toy, green paper, scissors, and tape.
supplies

To do this activity you will need green construction paper, tape, safety scissors, and a plastic toy that won’t get damaged from scissors.

1. First cut the green construction paper into strips to be the vines. Mine were roughly 1/2 inch wide.

2. Wrap the vines loosely around the plastic toy and tape the ends of the vines hold them in place. I used a dinosaur because I like that it had legs and a tail that I could wrap the vine around.

Dino wrapped in vines

3. Have your preschooler free the toy from the vines by cutting the vines off!

free the dino

Yay, the toy is free! Great job using scissors!

Another scissor skills activity that I did with my son was a Paper Plate Hedgehog Craft. He got to use his scissors and cut the plate to the make the hedgehog’s quills! This craft was easy to pull together, but tons of fun.

STEM

Gummy Bear STEM Experiment

Let’s find out if gummy bear candy grows larger in water with this fun (and yummy) gummy bear experiment. In this experiment, we will see if gummy bears grow in plain water, or in salt water, or not at all. What do you think will happen?

Gummy Bear Experiment

Supplies Needed:

gummy bear STEM experiment supplies
supplies
  • gummy bear candies
  • 2 glasses
  • water
  • table salt
  • ruler (optional)
  • pencil/pen
  • piece of paper

How To:

Pick 2 different colored gummy bears for this experiment. We picked 1 green one and 1 red gummy bear.

stir the salt

Fill both glasses with enough water to completely cover the gummy bears (and leave some room to grow). We added 3/4 Cup water to each glass. In one of the glasses, add one tablespoon of salt. Stir the salt so that it mixes with the water. Leave the water in the other glass plain.

Drop one gummy bear into each glass. Write down which color gummy bear is the salt water and which color gummy bear is in the plain water.

Ask your child what they think will happen to the gummy bears. Will one or both of them grow? My son guessed that the salt would make the red gummy bear shrink and that the green gummy bear would grow in the plain water.

Wait about 4 hours before taking your gummy bears out of the water. BE CAREFUL when removing them as they can easily fall apart. I fished them out with the tablespoon and carefully wiggled them off the spoon onto the table so that we could measure them.

gummy bear experiment results
Experiment results

DO NOT EAT THE GUMMY BEARS FROM THE EXPERIMENT!

RESULTS: One of our gummy bears was larger than the other! Drumroll please. . . the green gummy grew a lot in the plain water and the red gummy bear grew a little bit larger in the salt water. We placed fresh gummy bears from the bag next to the experiment ones for a comparison. OPTIONAL — To introduce rulers and measuring to my son, we did hold up the ruler next to the gummy bears from the bag and the ones from the experiment for him to see the difference in measurements.

More STEM Activities:

Incorporate more STEM activities into your little one’s learning with more fun activities. Check out my STEM Page for more ideas and experiments to try together: https://imaginationsrunningwild.com/stem/

Uncategorized

Salt Tray Writing for Preschoolers

Salt Tray Writing Practice for Preschoolers

Salt tray writing is a fun way for preschoolers to practice making their letters and numbers! Little kids love to touch stuff, so let’s let them with this fun activity! All you need is a tray/pie tin/round cake pan and table salt. Several years ago I discovered this activity and immediately went out and bought way too much salt! You only need to cover the bottom of the tray and really didn’t take that much salt. I still have 2 unopened salt containers –oops.

We used a round cake pan for our “tray.” I dumped some salt until the bottom of the pan was completely covered. I asked my son if he could make the letter A and he immediately made an A. Then he asked if he could make other letters! Absolutely!!! I picked up the pan and gently swished it from side to side so that the A disappeared and salt covered the whole bottom again. My son started making lots of letters and liked being the one to swish to pan after each letter. We practiced uppercase and lowercase letters.

Now that I knew that making letters in the salt tray was something he enjoyed, I asked him to make numbers. He did a great job with his numbers! This activity was a lot of fun and added variety to learning letters and numbers.

In between salt tray writing practice, I kept the tray in a cupboard. When it started to look yucky, I dumped the salt, washed the pan, and then added new salt. As long as your kiddo washes their hands before this activity, your salt should be usable for a while.

Animals

Toilet Paper Roll Unicorn Craft

toilet paper roll unicorn craft

My kiddo and I love unicorns! We’ve been reading a lot of unicorn books and we are becoming slightly obsessed 🙂 We decided to make a unicorn craft. I really like toilet paper roll crafts. They are usually easy to make and I always have empty toilet paper rolls sitting around. We made a blue toilet paper roll unicorn craft because my child loves the color blue. Be creative with your unicorn and make it whatever color you want! Pick out fun colors of yarn for your mane and tail. Ribbon also works if you don’t have any yarn.

Supplies Needed:

  • empty toilet paper roll
  • construction paper
  • yarn
  • googly eyes
  • marker
  • scissors
  • glue
  • stapler (optional)

Unicorn How To:

Pick a color for your unicorn from your construction paper supply. Then, measure the size of your toilet paper roll and cut out a rectangle shape to completely cover your toilet paper roll. Glue on your construction paper. You can also use glue dots or staple your construction paper onto your toilet paper roll.

To make your unicorn’s face, you need to cut out a triangular horn (we used yellow paper), 2 triangular ears, and an oval for the snout. Since my child is 3 years old and new to scissors, I did the cutting. Draw a mouth and nostrils on the oval. Glue the horn, ears, and snout onto the toilet paper roll. Stick on your googly eyes.

Cut yarn into short strips and glue around the horn. We glued the yarn on the inside of the toilet paper roll and then draped it around the horn. For the tail, cut your yarn into longer pieces and glue on the back. You can also staple the tail on if that works easier for you. Now you have your own awesome toilet paper roll unicorn craft!

More Unicorn-ness!

U is for Unicorn craft

U is for Unicorn Craft: I was working with my 3 year old on learning letter U and I wanted a craft to go with our letter of the week, so we made this U is for Unicorn craft.

Unicorn Themed Find the Differences: can you find 5 differences between these 2 scenes?

Unicorn Books: 15 awesome unicorn stories!

Maze: help the unicorn find its way through the maze to reach the rainbow.

STEM

Unicorn Graphing STEM Activity

This unicorn graphing STEM activity is so much fun that your kiddo won’t even realize that it is math! We call it our unicorn game 🙂 My son and I take turn rolling the dice and placing our color tiles on the graph. We like to guess what color is going to reach the top first before we start each round.

unicorn graphing STEM activity
unicorn graphing

How To:

First print this free template. The unicorn graphing template includes the dice, colored tiles, and graphing chart. I used regular printer paper; however, if you use cardstock, then your dice will be much sturdier.

Begin by cutting out the dice. Gently fold the gray tabs inward. Then begin to fold your squares into a cube shape. Add some glue to the tabs and glue them onto the underside of the squares as you form your cube. The very last tab is hard to glue and might require tape. Once your cube is formed, set it aside to dry.

Cut out all of the colored tiles. You will have 4 of each color–red, orange, yellow, green, blue, and purple.

Now it is time to begin unicorn graphing. Ask you child to gently roll the dice. What color unicorn is on top? Take a tile of the same color and set it on the graph above the corresponding unicorn. Keep rolling the dice and setting tiles in the correct columns until you reach the top of the column. Since you are not gluing the colored tiles to the chart, you can use this activity over and over again 🙂

Why STEM?

STEM stands for science, technology, engineering, and math. It is important to introduce these concepts to preschoolers in a fun way so that as they get older, they are excited about STEM subjects. What are preschoolers learning in this activity? Preschoolers are learning their colors (science)! They have to identify the color on the dice, find the same color on the chart, and then correctly add the same color tile to the graph. Preschoolers are learning how to graph, an important math concept! Add some extra math into this activity by counting how many of each color tile is on your graph and how many tiles your have altogether. Preschoolers are also learning about engineering as they help build the dice!

More STEM Activities

If your child enjoyed this graphing activity, I made a free blank dice and graph template so you can customize it with your own pictures. You can add computer images, stickers, or draw whatever you want on the dice and graph for your child to practice more graphing skills.

Check out my STEM activities: https://imaginationsrunningwild.com/stem/

Valentine's Day

Preschool Valentine Crafts

Love Bug Craft
Love Bug Craft

Not only is love in the air, but so is creativity! My son woke up and immediately began crafting. Before I was even properly caffeinated, he’d made this cute little love bug out of construction paper, heart stickers for wings, and pipe cleaners for antennae. It is so cute! He made it almost all by himself–he needed a little assistance with cutting the pipe cleaner. He used more heart stickers to hold the pipe cleaners onto the back of his paper. I love that he felt inspired to craft and came up with this cute little Love Bug idea! While he has enjoyed making Valentine crafts with me, he was really happy with how his own Valentine creation turned out.

Cupcake Wrapper Butterfly Craft

The other day, my son saw the cupcake wrappers and while he was holding one, said it looked like a butterfly wing. He then ran to the craft supplies box and took out a jumbo craft stick and his crayons. Using his favorite color, blue, he colored the craft stick to be the butterfly’s body. Then he added the cupcake wrapper wings with glue dots to the back of the craft stick. After a little help with cutting the pipe cleaner from me, he bent the pipe cleaner piece into a u-shape and attached it to the back of the craft stick with a glue dot too. It’s kind of hard to see, but he also drew a face on his butterfly! He asked me to put this on my website so other kids would see it and want to make one 🙂

More Preschool Valentine Crafts

preschool valentine crafts
  1. Heart Dog Craft: print off the template, color the hearts, and assemble them to form a dog.

2. Wooly Sheep: Say “I Wooly Love You” with this cute pom-pom sheep craft!

3. Valentine’s Day Wand: a super cute heart wand to sprinkle love all around.

4. Fingerprint Heart: make a heart shape design with your little one’s fingerprints and a paper heart stencil.

5. Lacing Heart: work on fine motor skills with this fun lacing heart craft.

6. Heart Hedgehog Craft: make an adorable little cardboard hedgehog with heart quills!

7. You Make Me Smile: a mosaic smiley face craft to give to someone special.

8. Bee Mine: make a cute little bee with heart wings for Valentine’s Day.

9. Beaded Heart Craft: make a beaded heart out of 2 pipe cleaners and pony beads.

10. Owl You Need is Love: create an adorable owl out of construction paper and cupcake wrappers!

I hope you enjoy making these preschool Valentine crafts as much as we did!

Valentine's Day

Beaded Heart Craft

Beaded Heart Craft
Beaded Heart Craft

Wow, this beaded heart craft turned out awesome! And it is so easy too! All you need are 2 pipe cleaners and pony beads. This is one of the crafts that I want to keep forever and display all year. I think my son did such a fantastic job making this heart 🙂

Supplies Needed:

Beaded heart craft supplies: 2 pipe cleaners and pony beads
  • 2 pipe cleaners
  • lots of pony beads

How To:

Begin by twisting the 2 pipe cleaners together so that they form 1 long line. Gently bend your pipe cleaners into a heart shape, with the connected ends being at the top. Leave the bottom ends unattached so your kiddo can add beads.

Pick beads and being stringing them onto the pipe cleaners. We had a variety of beads -shiny, sparkly, metallic, heart shaped, and an odd large one with a heart on it. My son just picked whatever ones caught his attention without making any kind of pattern. Fill up one side of the heart with beads, but leave some of the pipe cleaner free at the end so it can be connected to the other piece.

String beads along the other pipe cleaner. I helped hold the pipe cleaner to that the beads didn’t spill off when my son switched sides.

When your child is finished stringing beads along the pipe cleaners, carefully twist the 2 bottom ends together to form your heart.

More Crafts!

Valentine’s Day Wand: a super cute heart wand to sprinkle love all around.

Fingerprint Heart: make a heart shape design with your little one’s fingerprints and a paper heart stencil.

Lacing Heart: work on fine motor skills with this fun lacing heart craft.

Heart Hedgehog Craft: make an adorable little cardboard hedgehog with heart quills!

Valentine's Day

Smiley Face Craft

Mosaic smiley face craft

I love this happy, mosaic smiley face craft! It is perfect for giving to a friend or family member. While I had originally come up with for my son to mail to his friend, with Valentine’s Day just around the corner, I think it would make a great Valentine too! Mosaic crafts are a great way to use all of those little extra pieces of construction paper leftover from other crafts. Plus these crafts are great for fine motor skills, shape recognition, and spatial awareness too.

Supplies Needed:

How To:

Print out the “You Make Me Smile” sheet if you’d like to use my template. Otherwise, draw a large circle on a piece of paper.

Now it is time to make all of the little mosaic pieces. Cut the construction paper into a variety of shapes. I have a sandwich bag full of extra scraps of paper that I keep for mosaic crafts, so my son just pulled out the pieces he wanted. Having lots of different shapes and sizes to choose from helped him get the look he wanted without having to use pieces that didn’t fit well. So if you are cutting them specifically for this project, cut some extras so that there are lots of choices for your kiddo. I had to round a few edges for him since our craft is circular.

Now that you have your pieces of paper ready, glue them all over your paper to make your yellow face. Let your mosaic pieces dry.

Paint 2 eyes and a smile on your face. I like to use Crayola Washable Paints. These paints are so easy to wash off of my son’s hands, the paintbrush, and our table.

Let your mosaic smiley face craft dry before giving your project to a friend or family member!

I’ve joined Amazon’s Affiliate program to try and help cover the costs of this site. So if you buy something through one of my links on Amazon, then I get a small percentage of the sale (no extra cost to you). Thank you for your support! Happy crafting 🙂