My son came home from kindergarten with a really fun activity–disguise the turkey! It is a picture of a turkey printed with instructions to disguise the turkey so that it doesn’t get eaten for Thanksgiving. What a fun activity! It gave my son a chance to really be creative and have fun.
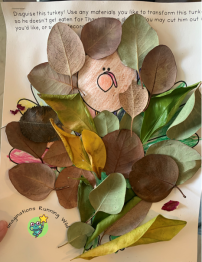
Disguise the Turkey!
The disguise possibilities are endless! One child added large ears and an elephant trunk; another kid covered the turkey in popcorn and pasted a popcorn bag to the bottom of the paper. My son decided to hide his turkey in a leaf pile! We went on a leaf hunt outside and found a bunch of neat leaves in different shapes and colors. First my son colored his turkey with crayons. He chose a rainbow themed for his feathers 🙂 Then he glued leaves all over his turkey so all that was left exposed was the turkey’s face, peeking out through the leaf pile. It turned out so cool!
I found a picture of a turkey and made a PDF that you can download(Free) for your child to disguise the turkey too! My son’s turkey was printed on cardstock. That made it more stable for gluing things onto it. If you don’t have cardstock, you can always print your turkey on regular printer paper and cut it out and glue into construction paper, or even a piece of cardboard.
I hope you and your child have as much fun with this activity as we did! It is a great family project. We really had to put our heads together to think of a good disguise and we enjoyed our leaf hunt!
Make a cute fox paper plate craft with your preschooler! Foxes go so well fall themes. Pair your craft with the fox books, Fletcher and the Falling Leaves by Julia Rawlinson, and Lawrence in the Fall by Matthew Farina.
Supplies Needed:
-paper plate
-orange tissue paper
-glue stick
-black pompom
-2 googly eyes
-scissors
-stapler
How to Make a Fox Paper Plate Craft:
Step 1: Cut a large triangle out of your paper plate. This will be the fox’s head/face.
Step 2: Next cut 2 small triangles out of the the paper plate to be the ears. Staple the ears onto the fox’s head.
Step 3: Our orange tissue paper came in 1-inch squares. If yours is not already this size, then cut or tear your tissue into 1-inch pieces. Glue your tissue all over your fox’s face and ears. It’s okay if your tissue sticks off of the side of your plate. You can just fold it over and glue the excess onto the back, or trim off the extra tissue paper.
Step 4: Once your craft is dry, add 2 googly eyes and a black pompom nose to your fox.
More Fall Crafts:
Fall is my favorite season and I just love to make fall crafts with my son! Foxes, owls, leaves, and pumpkins make such cute and fun crafts. Check out my list of fall crafts for more things to make with your preschooler 🙂
Paper bag puppets are one of my favorite go-to crafts! They are easy to make with supplies we already we have at home and my son always has fun playing with them. He ran around the house making his turkey paper bag puppet gobble at everything!
Supplies Needed:
-paper lunch bag
-construction paper in red, orange, yellow, and brown
-googly eyes (my son really likes these colored eyes)
-scissors
-white school glue
How to:
First thing to do is to cut out tail feathers. I cut out 2 of each color: red, orange, yellow, and brown
My son decided what color pattern order he wanted for his feathers. Then he glued the feathers onto the back of the backside of the bag. (The FRONT has the flap). We used white school glue to attach our paper feathers.
Next, flip your bag over to work on the turkey’s face. I cut out a yellow square, which I folded diagonally to make a beak. Then I cut out a red snood (kind of a squiggly shape).
My kiddo glued on the beak and snood. Then he attached his googly eyes and his turkey paper bag puppet was complete!
More Turkey Fun!
We read Animals on the Farm: Turkeys by Kari Schuetz and learned all about turkeys. This book has awesome pictures and was written at an easy to understand level. My son was so intrigued by how weird turkeys’ heads look! One of the cool things about this book is that it teaches the names for a turkey’s body parts, like a wattle and a snood. We found this book at our library. See if your library has a copy!
Check out my FALL postfor more book recommendations and fall-themed crafts that you and your preschooler can enjoy together 🙂 My son and I also made a Scarecrow Paper Bag Puppet. We think it turned out pretty cute!
Fall is here and it’s time to read some scarecrow stories and make a craft. We made a scarecrow paper bag puppet out of supplies that we had at home and I think it turned out pretty cute!
My son loves Julia Donaldson’s books! This is a cute, rhyming story about 2 scarecrows, Harry and Betty, who fall in love and plan their dream wedding. They set out in search of everything they need for their wedding. Harry and Betty find that they have to temporarily separate in order to get all of the decorations they need. The farmer notices that Harry is missing, and adds a new scarecrow. The new scarecrow tries to come between the happy couple. He smokes a cigar (Betty says “don’t you know that’s bad for you?”) and causes a fire. Yikes! Harry returns to save the day! They have their dream wedding with all of their friends 🙂
Otis the tractor has several wonderful stories. In this fall-themed one, the farmer introduces a new scarecrow to the farm. Everyone is excited to meet the scarecrow, but its frown drives them all away. The scarecrow stands silently scowling in the field, day after day. Otis worries about the scarecrow being friendless and decides to befriend him. During a game of who can sit silently the longest, Otis decides to sit quietly by the scarecrow. The farm animals join him and they all stay quietly together until the puppy gets the wiggles! Otis thinks he might have seen the scarecrow smile just a little bit to be surrounded by friends.
In this circular story, chicken wants scarecrow’s hat. With some great problem solving skills and a gift for bartering, she goes around the farm trading things with all of the animals until she gets something to trade scarecrow for the hat. The reader finally learns why chicken wants the hat so badly — for a nest!
I was desperate for some scarecrow stories to read with my preschooler and I saw this and bought it without really checking it out first. I am so happy I bought this book! This is a truly lovely story about seeing the good in others. The scarecrow and the crow become best friends. They see each other through the ups and downs of life, side-by-side. Get ready for compassionate feelings to bubble up and smiles to form as you read this one!
The silly old lady is back in this fall-themed story. She goes on a stomach-filling journey, gobbling up fall items (a pumpkin, a rope, and some leaves). Preschoolers will laugh away at all of the silliness going on in this book! What does she make with all of the stuff? Do you think its a scarecrow?
6. The Lonely Scarecrow by Tim Preston —
This book is an amazing tactile experience. The pages have ridges and shapes to touch and feel that compliment the lovely pictures. This is a beautiful story that teaches readers that just because something looks scary/different/unpleasant, doesn’t mean that it is. The animals are all afraid of the mean looking scarecrow, leaving it all alone. How can the scarecrow convince them that it wants to be friends? When the snow comes and falls over the scarecrow, it turns it into a friendly looking snowman. The animals flock to the snowman and the scarecrow finally has friends. Will the new friends remain after the snow melts? Check this one out from your library to find out.
Looking for more fall-themed stories? Check out my list of FALL BOOKSandAPPLE-THEMED activities.
Scarecrow Puppet Craft
Scarecrow Paper Bag Puppet
Make a fun scarecrow paper bag puppet with only a few supplies:
1 paper bag (lunch size)
construction paper
scissors
glue stick
googly eyes
a marker
My son picked out all of the colors for his scarecrow: greet hat, brown face, blue shirt, pink cheeks, blue patch, and yellow straw.
I cut out the shirt, face, cheeks, patch, and hat for him. He cut the yellow straw pieces.
First, my son glued the blue shirt onto the bag. Next he glued the face onto the flap of the bag. He glued the straw to the underside of his hat before gluing the hat onto the scarecrow’s head. Next, we flipped the puppet over and my kiddo glued straw pieces to the back of the sleeves. This made it look like straw was poking out the shirt.
After gluing all of the pieces onto the paper bag, my son picked really big googly eyes for his puppet. He stuck them on the scarecrow’s face, slightly under the straw. He drew on a great, big smile with a green marker for his finishing touch.
Alphabet Worksheet
Alphabet Maze
Make your way through this straw bale maze to get to the scarecrow at the end. Color the bales in alphabetical order to find your way out.
Click HERE to download this free PDF version of the Alphabet Straw Bale Maze for your preschooler to practice their alphabetical order skills.
Fall I Spy
If you haven’t already tried this fall-themed I Spy, now is your chance! It is full of cute fall-ish things that I love: hedgehogs, leaves, sunflowers, pumpkins, and of course, scarecrows! How many of each picture can you find? Write your answers in the boxes next to their pictures.
I hope you enjoy these scarecrow stories and craft!
DISCLAIMER: I joined Amazon’s Affiliate program to try and help cover the costs of my website. If you buy something through one of my links, then I get a small percentage of the sale. Thank you for your support! Happy reading 🙂
These acorn dot number coloring worksheets are perfect for fall! My son doesn’t like coloring very much, but he does like using his dot pens! I made these fun worksheets for him to practice identifying numbers 1-10.
Using dot pens (or color with crayons), spot and dot all numbers 1-10. There are two pages of worksheets. They are divided into groups 1-5 and 6-10. Spot the numbers and dot (or color) accordingly. Download your free PDF worksheet: Acorn Number Coloring
Pumpkin Counting and Coloring
This is a fun math skills worksheet to help your preschooler visualize quantities. You can use your dot markers again for this pumpkin coloring worksheet or color in the pumpkins with crayons. Look at the number on the left and then color the same number of pumpkins. Download and print your free PDF: Pumpkin Coloring
Fall Counting
Get in the fall-spirit with this math worksheet full of cute fall shapes. Count how many of each picture are shown in the box on the left. Then write your answer. Download and print your free PDF: Fall Counting
My son loves numbers and counting! I made “I Spy” worksheets for him to practice counting and writing his numbers. There are lots to choose from, including a super cute Fall I Spy worksheet to go along with these acorn dot number coloring worksheets.
Apple Counting Activity
For a more hands-on counting experience, I made an Apple Counting game with flashcards and pompom apples. Download these free flashcards and apple tree picture for your preschooler to practice apple counting too!
Check out my MATH SKILLS page for more math worksheets and ideas.
I love handprint crafts! They preserve your little one’s prints and you get to look back at them years later and ooh and ahh over how tiny they were 🙂 This is my son’s 3 year-old pumpkin handprint craft. We made a bunch of these to give out to family. It is a great way to personalize the holiday. Plus my son loved stamping his handprint on the paper!
Supplies Needed
This craft doesn’t need many supplies, which makes it a winner in my book. I hate having to run out to get supplies when I just want to get crafting! You will need:
orange and green construction paper
white paper (I used printer paper, but any white paper should work)
non-toxic, washable orange and green paint
paintbrush
scissors
glue
baby wipes / paper towels (to get paint off of hand quickly)
Handprint Pumpkin Craft
First I painted my son’s hand orange and then he stamped it onto the white paper. I had the baby wipes right next to us so that I could wipe off his hand right away.
Next, I painted his index finger green and he stamped it on the white paper.
While his prints were drying, I cut out the pumpkin shape from the orange paper and a green rectangle.
Once his prints were dry, I cut a circle around his handprint and a rectangle around his finger print.
My son glued the handprint onto the pumpkin and he also glued the finger print onto the stem. Then he glued the stem onto the pumpkin.
And ta-da, we were done! Not only do I love this pumpkin handprint craft because it is his little prints, but it was a craft that we could do together and both enjoy.
More Pumpkin Fun
I love fall and pumpkin spice, so my son and I have read a ton of fall and Halloween books and made lots of crafts together. Check out my Fall-Theme post for more fall ideas and my Pumpkin Fizz post for a STEM pumpkin-themed activity to enjoy.
Your preschooler will have so much fun making this coffee filter fall leaves craft. The leaves are easy to make — you just have to color them and spay with water 🙂
Supplies Needed:
This craft doesn’t need require many supplies, which it makes it one of my favorite go-to activities!
Coffee Filter Fall Leaves Craft supplies: markers, spray bottle, coffee filters, and scissors
You Will Need:
-coffee filters
-markers (make sure that they are NOT permanent)
-spray bottle (with water)
-scissors
How To Make Coffee Filter Fall Leaves:
leaf designs
The first thing I did was draw leaf patterns on the coffee filters. You can trace leaf designs that you like if you do not want to free hand draw it. I recommend drawing with a marker, not a pen. I tried a pen for one and you could see the ink outline, whereas the outlines I drew with a marker disappeared.
color in your leaves
Then my son and I colored in our leaves. It is important to use markers that easily wash off of surfaces because the color will bleed through the coffee filter. Don’t worry about how your leaf looks because once you spray it with water, the colors will run together and any design you had will be gone.
After coloring the leaves, I cut them out. I wish I had made my stems a little thicker, but it turned out okay.
Now it is time to spray the leaves! This is my son’s favorite part 🙂 Once you begin spraying the coffee filters with water, the color will immediately bleed onto your surface. We chose to spray ours on the grass. If you don’t have an outdoor area that you can make a mess on, then make sure that whatever surface you are using is cleanable, or put wax paper under your coffee filters to catch the run off. We learned that the more water your spray, the less vivid the colors are. Experiment with lightly versus heavily spraying your leaves and see which way you like best.
Coffee Filter Fall Leaves Craft
We left our leaves on the grass to dry in the sun. They dried in about 20 minutes (it was a warm morning). They turned out pretty neat 🙂 We are happy with our leaves and can’t wait to make more of them. I want to make a leaf garland to hang in our house!
More Fall Fun
If you would like some fun, fall-themed books to read after you make your coffee filter leaves, then check out my FALL post.
Looking for more fall activities? Check out my APPLE post, which has book suggestions, STEM activities, and a find-the-differences worksheet. My son also recently made PUMPKIN FIZZ, which was a super fun science experiment to tie in with our fall-theme.
Fall is here and with it, beautiful leaves! Let’s go on a leaf hunt and collect leaves. There are so many fun things to do with leaves: rubbings, wreaths, and making a leaf stick puppet!
My son really wanted to make leaf stick puppets so went in search of fall leaves. This became a fun nature activity as we also found 2 awesome rocks and 3 beautiful feathers in addition to a dozen different kind of leaves. A lot of our leaves were brittle and didn’t survive the walk home. However, those that did were lots of fun. We made leaf rubbings, trying crayons and colored pencils, and we made a leaf stick puppet.
Leaf Stick Puppet
Supplies needed:
-a leaf that is not very brittle
-2 googly eyes
-1 black marker
-1 craft stick
-glue dots or tape
Make Your Puppet:
The first thing we did was decide on a leaf to use. It needed to be sturdy enough to withstand drawing a mouth and being attached to a craft stick. We decided to use a dried magnolia leaf.
My son stuck on 2 googly eyes and drew a smile on his leaf with a black marker.
Then, we taped our leaf to the craft stick.
My kiddo had a great time taking his leaf puppet on an adventure through our house and our backyard. He was excited to show his leaf a lot of his toys and the refrigerator 🙂


